When we see great landscape or cityscape photographs today, the first thing most photographers think is “How do they get those images to look that way?” The moment of capture for sure plays a huge role in the whole production of any stand out image. Are the exposure settings correctly set to facilitate a clean, well balanced RAW image? Do we need to bracket the scene to capture and then process the vast dyanmic range that is visible in the image? Are we using slow shutter speeds to show movement or totally erase it altogether (ND Filters)??
There are too many variables here to list as you are probably well aware of.
Once we do have a RAW file that is ready to be worked on, there is an entire slew of options for us to sharpen and just make the images pop that cannot be done anywhere else but in Post Production.

This article will explain some sharpening tips on making your landscape/city scape images be the best as they can be. These principals apply to most other forms of Photography as well. Since the weather is starting to break here in North America, no time is better than now to get out and shoot the great outdoors!
1) Lightroom Sharpening
The actual name for Lightroom is “Adobe Photoshop Lightroom” so technically I am explaining a Photoshop technique when speaking of sharpening. But regardless of what you call it, Lightroom has a very capable sharpening section in the DETAILS panel that resides in the Develop Module.
All the sliders in this panel should be used when the image is at least at full 1:1 size. You want to be able to view the fine details as you make sharpness adjustments.

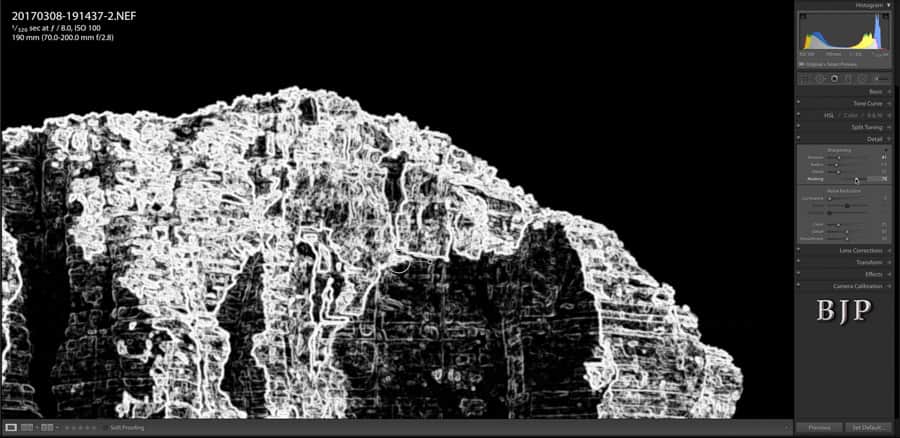
All sliders also can be used in conjunction with the modifier key which is the ALT/OPT key. The top slider (Amount) will show the image in greyscale. The radius and detail sliders will show the image in a greyish type view where you can see the fine outlines that are being sharpened. Finally, the masking slider is a black and white view showing where the sharpening is actually taking place.(SEE IMAGE).
The Sliders
The amount slider is just what is sounds like – the amount of total sharpening applied to the image. The more you slide it to the right, the more the effects of the sharpening will have on your image.
The Radius Slider controls how far away from the middle of each pixel that the sharpening will have effect. The smaller the vakue (left), the thinner the sharpening radius is. The higher the number to the right, the thicker.
The Details Slider is pretty much the other areas of the photo and not specifically the edges like the Radius slider. When there is an image with something with lots of textures on the subject, such as a piece of clothing, the Details slider will produce a nice boost in detail without over sharpening the edges which can cause those ugly HALOs we try to avoid.
Finally, the masking slider is just that – a mask. When all the way to the left, the mask is pure WHITE and lets sharpening effect the entire image. While holding down the ALT/OPT key and sliding to the right, you will see the image area begin to go from white to only white on the detail areas. If you slide all the way to the right, only the most obvious edges and details will be sharpened.
While this is a very effective method of sharpening, it is global and sometimes we want only very specific areas of the image sharpened. This is where Photoshop comes in.
2) Unsharp Mask In Photoshop
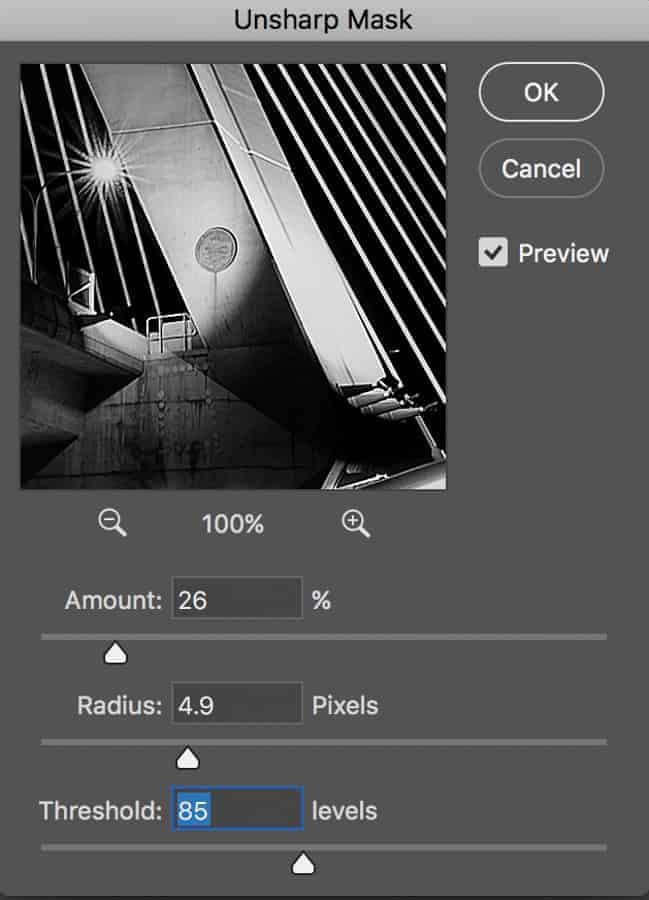
The UNSHARP mask feature in Photoshop has a very confusing name. It is actually a sharpening tool so don’t pay any attention to the “UN” prefix in the name. The sharpening works by creating a slightly blurred version of the image and it subtracts it away from the original to find the edges within the image. This creates the unsharp mask. The next step is contrast being increased along the edges using the mask created by Photoshop and this leaves behing a sharper final result.

The AMOUNT slider, shown as a percentage, controls the amount of each overshoot. This is simply the amount of contrast added to the edges.
The RADIUS slider controls the amount of blur applied to the original to create the mask. The smaller the radius, the smaller-scale detail can be enhanced.
Finally, the THRESHOLD sets the minimum brightness change that will have sharpness applied. Threshold is well suited to sharpen pronounced edges while not having an effect on subtle edges.
Any and all sharpening should be done with the image at full 1:1 size or better. Using 200% is a really good zoom percentage for use inside Photoshop.
3 ) Smart Sharpen
Right there in the same list of choices in Photoshop’s filter menu of sharpening options is Smart Sharpen. This is the sharpening tool with the MOST options and when used correctly, it will yield the best results for your landscape and most other types of photography. Landscape photography is very complex because we often have very near edges and also very far and they act differently when being adjusted. With masking in Photoshop, certain areas of sharpening can be masked away while other areas remain strong. This is one distinct advantage over little brother Lightroom. Anyway, back to Smart Sharpen!
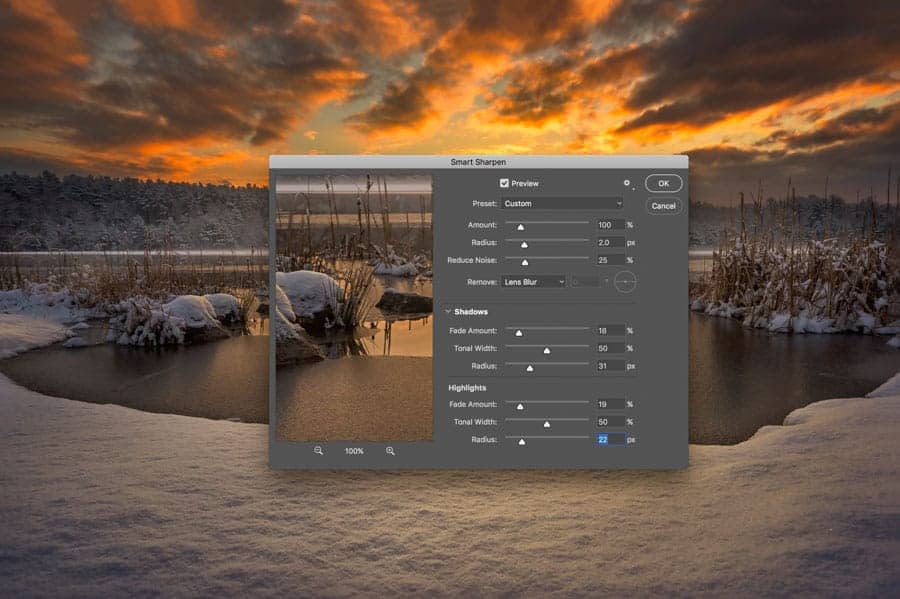
The Smart Sharpen dialog adds the ability to save and then load presets that we can use over and over if desired.

The Amount slider has a range from 1-500%. In general, most images don’t need any value higher than 100%. You can certainly push it past this amount but you can expect the normal sharpening artifacts such as producing halos and just an unrealistic look.
Radius is the slider that controls, in pixels, the edges that the Smart Sharpen filter will modify. You can select from .1 to 64 Pixels – .1 for very fine control all the way to 64 for very broad sharpening adjustments.
Reduce Noise slider is pretty much straight forward AND an excellent option to have in this list of options. Another reason why Smart Sharpen is an extremely powerful and popular tool today. Because of all of these settings, you can now see why Adobe has included a way for you to save PRESETS!
These values all depend on the resolution of your image and should be adjusted accordingly.
The REMOVE option should generally be set to LENS BLUR for photographic images as it does a great job of reducing the halo effect.
The Shadows and Highlights also have their own set of sliders for advanced control. The FADE amount slider Controls the overall sharpening in the highlights or Shadows.
Tonal Width slider dictates the limits that sharpening has to specific tonal regions of the image being adjusted. As an example, if you choose a lower Tonal Width in these areas, the sharpening will be restricted to those tones. A higher value set on either one expands those range of tones.
Finally, the Radius slider works just like the UNSHARP mask – moving left specifies a smaller area and to the right a larger one.
IT SHOULD BE NOTED that to obtain the best results using these sharpening layers, first convert the COPY of the original layer to a smart object. Original layer means either the pixel containing layer from which the copy is being made. This could be early in your processing or later on as a layer merged and sitting on top. Converting to a smart object allows you to go back at anytime and make adjustments. Also, change the BLEND MODE to LUMINOSITY on these sharpen layers (High Pass Filter not included) to avoid any weird halos. It is highly recommended.
5) High Pass filter
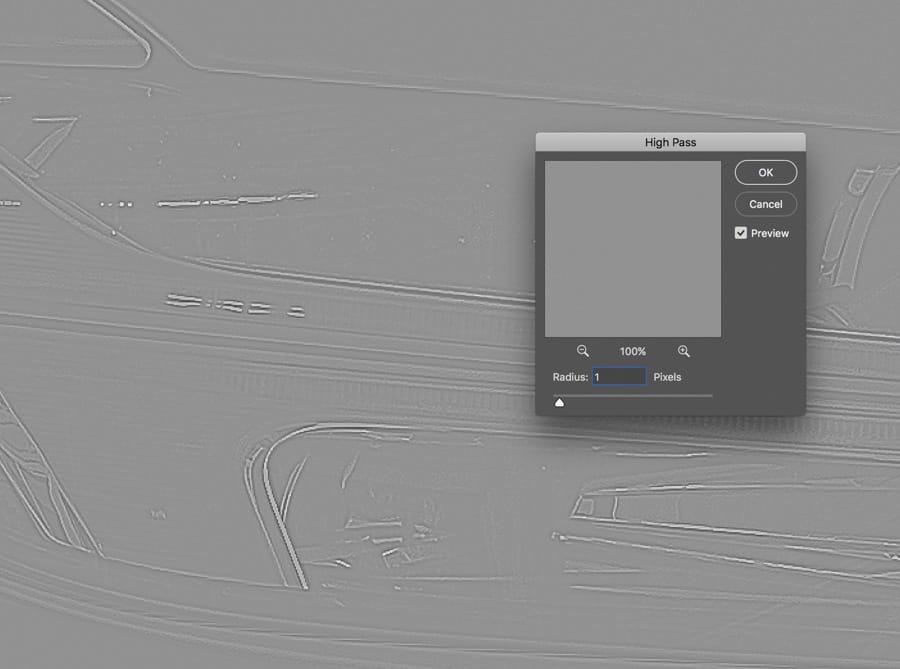
Another great way to sharpen your landscape images (and other images) and a much more simple one is to create a HIGH PASS filter layer. Again, make either a copy of the image pixel layer you have or create a top copy of the visible layers (CMD+OPT+SHIFT & E on a Mac and the Windows equivalent). Convert this to smart object by right clicking on the Layer in the layers panel and choose to convert to a smart object. This, again, allows us to go back and make adjustments at will and at anytime during our editing.

Using a small Radius of 1 – 1.5 is usually more than enough. Don’t go crazy here!! Only a very small Radius is needed! Once you do this, the image area will turn to a 50% grey with only what appears to be an outline of the image showing the edges. This is exactly what we want.
Now simply go over to the layers panel and the BLEND MODE and change it to either OVERLAY or LINEAR light. Linear Light will give you a more dramatic effect while overlay is less drastic. Choosing linear light is the better option as you can always adjust layer opacity and also mask out overly sharpened areas with a brush. Also, using luminosity masks can also be a very nice option when you want sharpening applied only in specific tonal ranges within the image.
There are many other ways to bring out detail and more in Photoshop – what's yours? Please leave feedback below if you can add to this or if you need any questions answered.
Keep Shooting and Editing as well 🙂

Hi Jim,
Great article, typically using a high pass filter is my preferred method but I will definitely be sure to try the other techniques as well.
Thanks,
Preston
By the way, amazing photo <3
Thank you for sharing! The problem seems simple, but through your pen, it impresses me!
The knowledge you share really changes me in life, I sincerely thank you for the things you have done, sure your blog will help more people. Sincerely thanks
It’s hard to come by experienced people about this subject, but you seem like you know what you’re talking about! Thanks