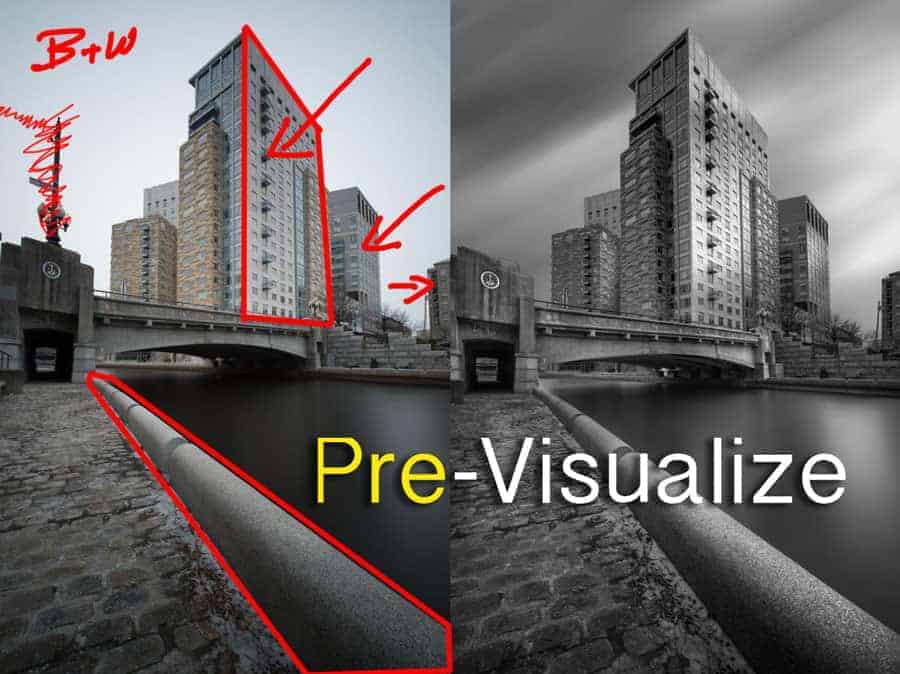
Pre-Visualization: The Most Important Aspect of Photography
Photography is very much alive and well today. The equipment we have access to now is far more advanced in comparison to what we had just a few short of years ago. With the dizzying array of choices, many can become distracted from the single most important aspect in photography or any art form for that matter and that is the topic of seeing or pre-visualizing your final outcome from the start.
It doesn’t matter if the image being created is a portrait, landscape, cityscape, product, architectural work, etc – they all have one thing in common: The Pre-Visualization of the final outcome.
This article will dive into some of the very most important aspects of “seeing” the image before a shutter release is ever pressed. The vision is the start. Where we go from there dictates the equipment used, how that equipment is used, how the image is processed in post-production and then the final output form whether it be digital or on a physical medium such as a fine art print on metal, for example.
The Importance of “Previs”
The motion picture industry has a great need to pre-visualize their work. It is why the Director of Photography on a movie set is one of the very most important players in the entire production. Of course, the director is telling the story but this story cannot be told properly without the technical hurdles being jumped over and then fading into the background without the viewer ever seeing all this work being done.
Every movie (or TV series) has been thought out and carefully executed. Camera placement, lighting, filters, audio equipment placement, etc – it all must be taken into consideration.
Storyboards are created and sketches are made for the many scenes that will be part of the project. Nothing is by chance; it is all very deliberate.
The DOP (Director of Photography) is to set the composition, the exposure, conceive the lighting, and designate the filters or other photographic controls to be employed.
This is very similar in how you should approach your photography projects. It is here that the crossover between creativity and your technical know-how come into play. This CANNOT be overstated and it is for sure a key in creating stand out work.
Equipment Choices
Your camera should be an extension of your mind and body. Now that may sound a bit “artsy” or “cliché” but it is very true. I have seen far, far too many people get totally caught up in the gear wars thinking that it is the equipment that is holding them back from creating stellar images. It isn’t; trust me.
With today’s camera bodies and modern lenses, even an entry-level camera will allow you to create super high quality work. As a matter of fact, with proper lighting, you can create some tremendous images today with your smartphone alone.
Know How – More Important Than What You Have
Knowing how to use the gear you own is much more important than having the best gear out on the market. Techniques can be learned that will allow you to capture images that you want and can see before ever touching the shutter release.
An example below is this panning shot. This requires a certain technique where you must set focus on a specific area of the subject that is moving while panning the camera to keep that focus locked onto that area you're focusing on. It can be tricky depending on their distance from you and the angle in which they are approaching/moving away. This is being done while moving the camera to help introduce the background motion blur. To get this, settings knowledge is required.
Bright, outdoor sunny days with a wide aperture can make this impossible since you're shooting at a much slower shutter speed (1/30-1/40th sec) and lots of light comes into the camera and on the sensor. Stopping down is an option. This was shot at f20! But let's say, for example, you wanted to shoot wide open for an outdoor portrait using a fast aperture such as f1.8 or f2.8. In some situations, it will be too bright to do so! Knowing immediately that you may want to use an ND filter to slow the shutter down is an example of knowing what to use to get the desired result you envisioned.

These are the things that really matter when shooting and trying to make the scene in your head first rather than just hoping for that special image to pop into place. The cameras, lenses and other equipment we use to create our images can only take us so far, however. Visualization and equipment use know how can get you some pretty amazing results. When adding to that the world of post-production tools available, your vision is pretty much always a possible reality. It is knowing how to mix the creative vision, equipment and post-production work all together to produce amazing results.
Post Production Tools
In computer applications such as Adobe Photoshop, the creative potential we have as photographers basically can go as far as your mind wants. If you can see it visually in your mind, you can create it in Photoshop. That isn't to say these are simple tasks. They are not at all! Many people have the tendency to assume because it is digital and done on a computer, image editing is “cheating” or “not real” photography. If you are of this thinking, ask yourself “why?”
Ansel Adams was a world known photographer that produced countless stunning landscape images over a great span of many years. He was a master in the darkroom. The tools we have today are much more simple to use and don't require dangerous chemicals. They are, however, much more powerful. They can be used to create amazing images right at your desk. However, THE VISION must still be there to dictate what tools are used. Just because they are more simple to access doesn't mean they are any less part of the creative process.
Vision To Reality
Below are some images I've created using PRE-VISUALIZATION in the field and then back at the computer to make the vision a reality.

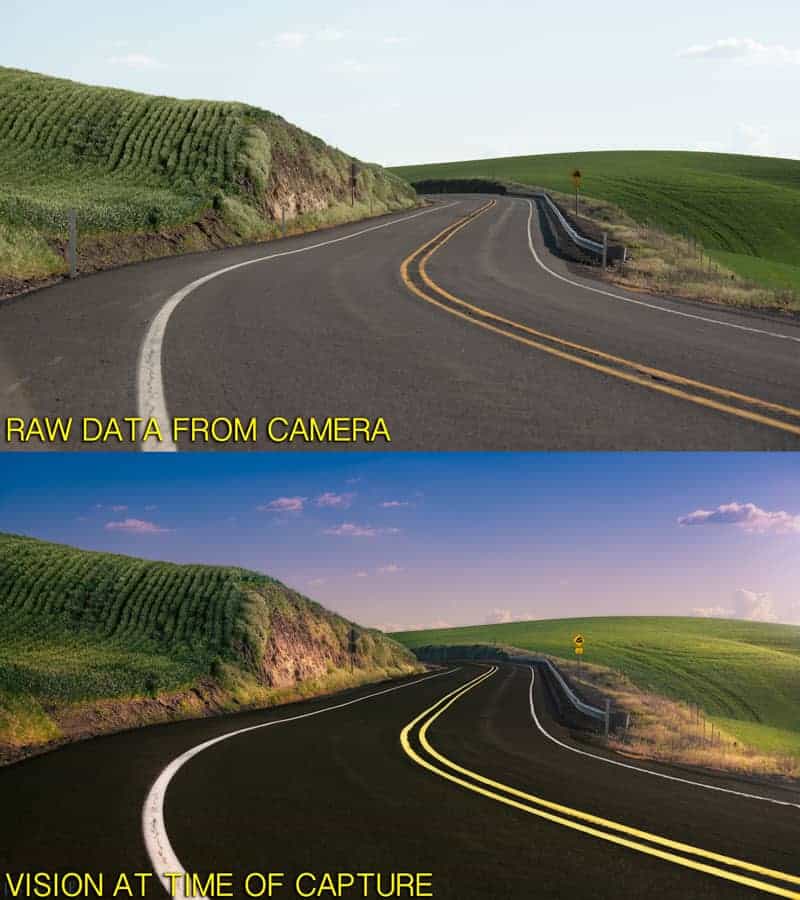
This scene appealed to me. It wasn't much at the time but there is just something about winding roads that always speak to me. I had the idea to include the lush green from the Springtime wheat and create an ultra clean. too good to be true scene. It is a bit surreal and pushed to that area between real and fantasy, but the choice is yours when you begin to harness the power of post production.
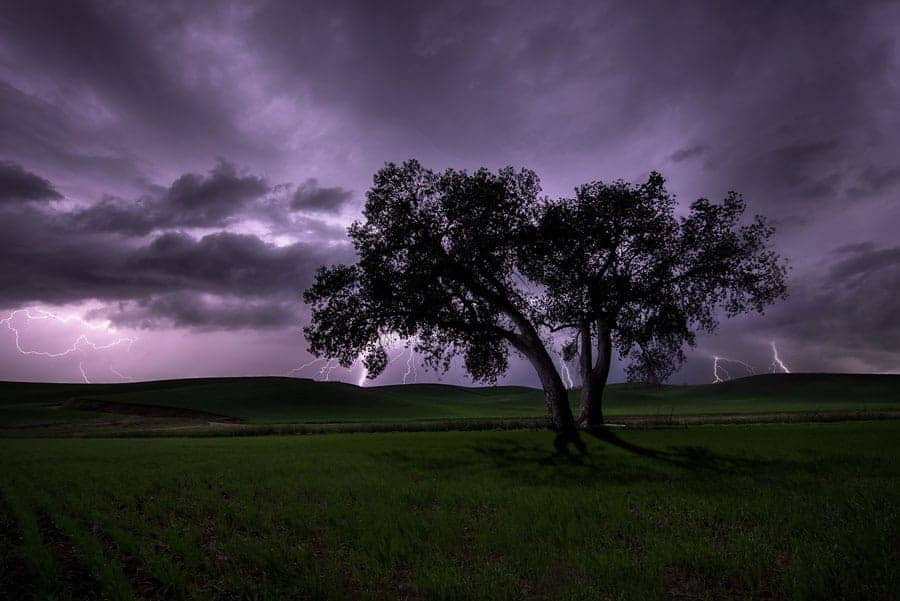
This next image is from a trip out to the Palouse area of Eastern Washington. A rolling thunderstorm came in one night and we headed out to capture it. Lightning storms can be very thrilling (AND DANGEROUS) and can produce some dramatic scenes. Using the BULB function on your camera to hold or taking many shots a few seconds long is a great way to catch thunder bolts. When you have captured several of them, you then have the ability in Photoshop using layers to blend the bolts from many shots into one composite for a thrilling image. This is done using blend modes (lighten works great here) along with layer masking to remove what you do not want on those layers.

Product Image Example
Product photography is one genre of photography that requires great PRE-visualization before the project even begins. In ad agencies, ideas will be worked out with art directors and marketing personnel before an ad campaign is started. Everything we see on billboards, print ads, ads on our phones – they have all been very carefully planned out. Great care is given to the mood, feel and energy of the work.
The next time you watch your favorite TV show or a movie, pay close attention to the color and lighting. It's all extremely deliberate and effective. Product photography is no different.
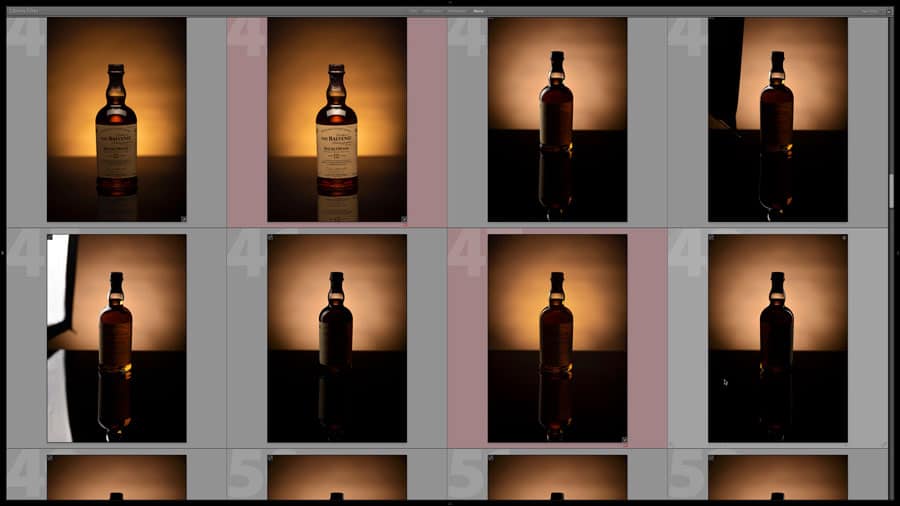
Here is an example of a simple bottle shot that I thought up. Combining the settings on the camera with the placement of lights while shooting and knowing through the use of selections and tools in Photoshop, I'd be able to make the bottle look very much appealing. Here are some of the working images taken to create the “pieces of the puzzle” needed to build the composite below.

By stacking the layers one on top of the other and again using blend modes/masking, you are able to create very pleasing work that you saw in your mind before ever picking up the camera,

Visualizing Corrections and Saving THE DAY!
Another really good reason to be well versed and comfortable in post-production is that you can really save the shoot and set clients at ease! Here is an example where the woman was so worried because of her nails which she had cracked the tips of that day. It was for an engagement shoot and I told her to have no worries; I'd fix it. That set the tone for a great shoot and I had two other shoots as a direct result of that shoot.
Visualizing and having the confidence of knowing you can create what you set out to create is when photography becomes more artisitic and also fun!

Conclusion
Seeing something before it is created is done every day all around the world. From automobile design, architecture, painting – it all starts with a vision. If you're stuck with your photography and not sure why you're not getting the images you want, you may want to change your approach and focus more on quality over quantity. This starts with planning your shoots much more carefully and creating a mental idea in your mind of what it is you are trying to capture and create. Learning Post-Production with applications such as Photoshop really scares some people. It is a big time commitment to learn the vast number of tools, tips, tricks and techniques available within Photoshop. These things along with solid camera technique and understanding how all of this mixes together is the key to super image making down the road!

Invariably, my best shots are the ones I “saw” in my head before ever looking through the camera. Good tips and a good reminder Brian!
Thanks to share this informative article.
Very informative. I only hope that every once in a while I will be able to visualize a final result that is satisfying.
I Got some good idea by reading this topic. Great information thanks for sharing. – dentist in hyattsville