I often hear portrait photographers lamenting the fact that they don't have a studio. I can understand where they are coming from (which is why I'm in the process of buying a studio right now), but I think that most photographers really don't need a studio at all. In fact, you can get that “studio look” in your photography without even leaving your living room.
There are several INEXPENSIVE ways to get a studio look in your photography without actually working in a studio. The first way is to use a bed sheet, the second a reflector, and the third… use flash!
Method #1: The Free Option
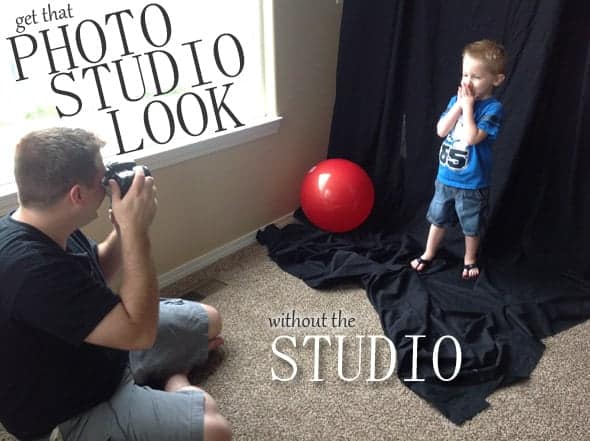
Photography doesn't have to be as complicated as it sometimes seems to be. 15 minutes ago, I wanted to take a picture to illustrate how you could get that “studio photography” look in your photos without expensive gear or even a studio. So, I found a large window in my home to use as a light source for the photo. Then, I went and hung a black bed sheet on the wall with some thumbtacks to use as a background. Then, I took the picture. Simple as that! I had great photos of my kids in just 15 minutes without spending a dime on additional gear.
The photo below tells the rest of the story. It totally works!
METHOD #2: The “Other” Free Option
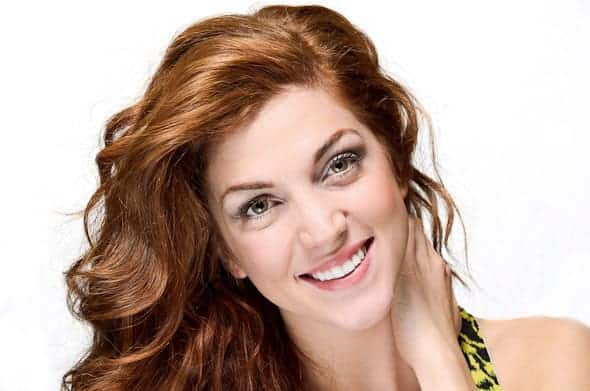
See the photo below? If I would have shot this in a studio, it would have turned out exactly the same. No different at all.

I shot this photo while in a building with horrible yellow incandescent lighting, while doing a video tutorial for the online portrait photography class. We were doing a location shoot inside the Idaho State Capitol building, which is very dim and has ugly yellow lighting. I wanted to show how you could get many different looks on a shoot in the same location, so I whipped out a reflector and turned it to the white side and placed it behind the model.
Then, I set up a 22″ beauty dish with a YN-560 flash (total cost $150) directly above the model and placed a reflector under the model (barely outside the frame) to kick back some more light onto her face. This simple lighting set up (often called clam shell lighting since the flash and reflector envelop the model from above and below) turned out a great result.
Did I need an expensive set up for this photo? Nope! Just a little creativity in getting the studio look without a studio.
The Third Free Option
I think photographers who start out in flash photography limit themselves by not allowing themselves to think creatively. Often while I'm on a shoot outdoors, I will create a few “night” portraits or “studio” portraits right on location no matter where we are or what time of day it is.
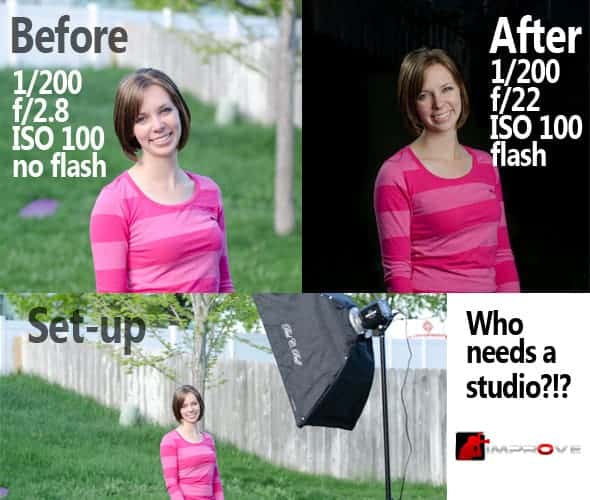
This technique is actually quite simple to do. You just overpower the sun's light with the light from your flash, then adjust the exposure on your camera. If you turn up your flash power enough, you can make the background completely black (like a black studio background), or you can turn it most of the way up and make the background look like night even if it is the middle of the day.
5 Steps to Black Backgrounds Without Any Background At All!
- Turn your camera to manual mode and grab a flash
- Set the shutter speed at 1/200 (flash sync speed), and your ISO as low as it can go (usually ISO 100)
- Adjust your aperture up until the picture is completely black. This will usually be around f/18 or f/22
- Use a flash on FULL POWER (you might need two flashes if it's very bright outside). Don't worry about the flash appearing too bright in the photo. One you adjust your aperture to compensate for the bright flash, it will look great
- Snap the picture. You can adjust the aperture until the brightness on the model looks right
But wait! There's more!
There is more to getting the “studio look” in your photos than simply using a backdrop. There are other aspects of working in a studio that can be achieved without actually owning a photography studio.
One of the main advantages of working in an actual studio is that the photographer can control the lighting 100% and doesn't have to worry about annoying incandescent lights messing up the shot, or reflected light from shiny surfaces in the room. Studio photographers can fix these problems by painting all walls and the ceiling white or black (the white is like having a built-in fill light and other photographers paint black to prevent any reflection).
So when working outside a studio, you can encounter problems because you get other light sources ruining the shot. You can see an example of that in the photo below. The light from the flashes is neutral, but the yellow incandescent highlights from the ugly yellow lights in the room are also hitting the subject and causing light inconsistencies. You can address this in Photoshop by selectively changing the color temperature on the affected areas, but there is a much much simpler way.
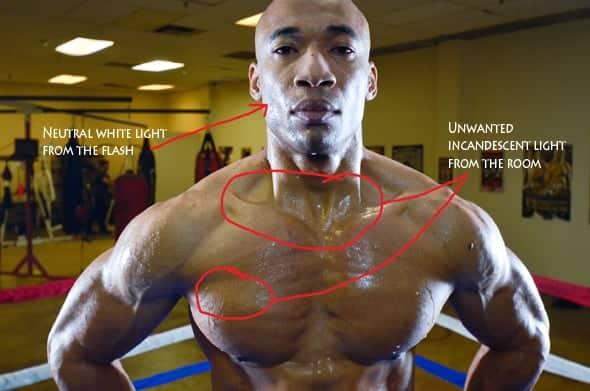
The easiest way to prevent the overhead lights in a room from ruining your flash photography is simply to turn up the power of your flash. If you overpower the light in the room, it won't affect your photo at all! When I shoot in a space like this with a lot of other ambient light sources, I usually turn the power on my flash up to full so that other room lights do not affect the photo nearly as much.
You could also gel your flash with a warming gel to better match the color temperature of the lighting in the room and then change your white balance, but who wants to go through that much trouble when you can just turn up the power?
Don't want to miss any articles on Improve Photography? Join our facebook group!

Thanks for these good tips.
very interesting, but how do you get it so your flash does not blow out the subject?
You’d just need to adjust your exposure settings to ensure they aren’t letting much light in. That way when the flash hits, it’s properly exposed. High f-stop would be your best bet on a not super expensive camera.
this is good stuff, thanks!
I love this article. I knew most of the information but the last outdoor black background was an awesome trick. I ahve never taken it to F22 outdoors.
Question: You had your strobes set to full?
I use yongou 560 strobes-would I need to use 2 together to overpower the ultimate fill light (sun)
Ha I read to fast i see my answer. Thanks
@Corry Heinricks – You just turn up the aperture on the camera and it makes balances the flash.
@Aaron Kershaw – With a YN-565 or similar speedlight flash, you will definitely want them on full. If it’s the morning or evening, you should be fine, but you would probably need two of those if it’s the middle of the day so you have enough power.
Another great article. I love the “invisible black backdrop” option and is something I need to try this week.
WYI – The hyperlink to the beauty dish didn’t load.
Very interesting!
@Darren – fixed it!
WOW! Beginner photographer from San Juan, Puerto Rico.
I struggle a little with studio lighting and have stayed away from it until I feel more confortable with the other aspects of. photography (shooting in Manual, “seeing the light” on my subject, etc). Thank you sooooo much for this article and for what you do for us beginners. : )
Thanks so much Jim! You are an excellent teacher!!!
Fantastic tips! Thank you!
very educative!
Cool! Thanks!
I enjoy your teachings. You have taught me some very cool techniques. Thank you so much for sharing your knowledge.
thank you
so nice of you for sending me your techniques
lloyd
God bless
I am going to pin this for my husband to check out. He’s the man behind the lens in our business. We have a “studio” in our home and have lighting, reflectors (foam boards, really), etc. Always looking for extra tips to get that studio look!! Thanks for these!
You’re truly a genius…and your site is addicting 🙂
I’ve done the first trick numerous times. =) We use our front door since it’s a full pane of glass. At Christmas we used a navy backdrop and strung white lights behind it to make it look like stars shining through. =)
I still haven’t tried the one to make a black background outdoors yet…