Time is one of our most precious resources. As a photographer, you can spend as much time behind the computer as you do behind the camera, and sometimes much, much more time. On any given day most of us would rather be out with our camera than facing a computer screen. Don’t get me wrong, photo editing is an important part of the process and often where the magic happens. I'll admit that I really enjoy the post-production of my images. To me, the shutter click is only the beginning of the creative process. Getting the photos into Adobe Lightroom (or the editor of choice) is a huge step toward making the image that was visualized when it was taken. However, the old adage “work smarter, not harder” holds true. Finding ways to streamline your workflow will not only make your photo editing easier, but will also give you more time for going out and shooting.
One of the simplest and most important ways to speed up your photo editing is by using shortcuts. Lightroom has hundreds of shortcuts, and it would be nearly impossible to memorize them all. But by learning a key few, you will be able to save hours over the course of your lifetime. This is far from a comprehensive list of every available shortcut. However, it is a list of 20 easy shortcuts that will save you time and make your photo editing easier. For a more complete list of Lightroom shortcuts, download our printable shortcut sheet for the Mac or for Windows. Just print it off and use it as a handy reference the next time you are editing your photos!
Disclaimer: If this article looks familiar, that's because portions of it were originally published by Dustin Olsen about 3 years ago. I figured with all the new features added to Lightroom, and the huge number of keyboard shortcuts available, it was time to expand this list and update the article.
Module Navigation
As of the writing of this article, the Adobe Creative Cloud (CC) version of Lightroom has 7 different modules in which to work: Library, Develop, Map, Book, Slideshow, Print, and Web. If you're like me, you probably spend about 98.6% of your time in Lightroom in either the Library or Develop modules. You can click on the module name in the upper right of the user interface to move between modules. Or, to move quickly between the Library and Develop modules, just hit the G for Grid (same as Library) or D for Develop. The modules are numbered 1 through 7 as displayed from left to right. You can also use Cmd + Option (Mac) or Ctrl + Alt (Windows) plus the number corresponding to the module. As a bonus tip, you can turn off selected module display names by right clicking on the module names and checking off the ones you don't want shown. It's one way to help clean up the look of the user interface.
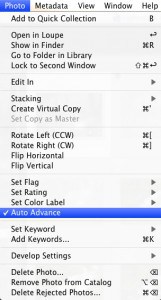
Caps Lock Auto Advance
Survey Mode
Culling photos is such an important part of anyone's workflow, whether you use star or color ratings, or flags. There are times when we need to narrow down the selected images even more. This is particularly true when there are several images that are very similar. There may be only slight variations, such as a smile or facial expression, sharpness, or subtle changes in the light, from one image to the next. Instead of scrolling through the filmstrip and looking at each image individually, try using the survey mode to compare the images. You do this by selecting all of the images you want to compare, then hitting N on the keyboard. Survey Mode will display all of the selected images at once on the screen, so you can decide which one(s) are best. As you mouse over an image in Survey Mode, notice there is an “X” in the bottom right corner of the image. If there is an image you don't like, click the “X” and it goes away. You continue this process of elimination until you are left with the clear winning image.
Hide Panels
This may not directly speed up your workflow, but sometimes it's nice to work with a clean slate, without a lot of distractions around an image. This is especially true when scrolling through images or using the Survey Mode to make image selections. You can hide the side panels using the Tab key. Press Shift + Tab to hide all panels, leaving only your images on the screen.
View Full Screen
From any of the modules within Lightroom, you can cycle the full-screen mode for a selected image by pressing the F key. Doing this fills the screen with your selected image and blacks out the Lightroom interface. This is a great way to get a good feel for how an image is looking as you are moving through the editing process.
Lights Out Mode
This is very similar to the full-screen mode, but doesn't completely fill the screen with the image. Use this shortcut with an image selected and in loupe view within the Library or Develop Module. Pressing the L key once will gray out the surrounding Lightroom interface to remove the distractions. Pressing the L key twice will black out the surrounding screen and really make your image stand out. Pressing the L key a third time will take you back to normal view.
Add to Collection
Using Collections in Lightroom is a great way to keep your very best images from a shoot in a separate folder for easy access. Keep in mind that this will not move the image files around on your hard drive, but rather creates another reference for them in a different place within Lightroom. Collections can be created and viewed from within the Library or the Develop modules. As you move through your images, you need a quick way to designate select images to be put into a Collection that you create. The slow and cumbersome way of doing this is to simply drag the image into the folder in the Collections panel. There is a much faster and easier way. Right click on the collection folder you want to work with, and choose “Set as Target Collection”. Then, as you navigate through you images, if there is one you want to add to that Collection, just press B on the keyboard. This is a very fast way to build up a Collection of the best images from a shoot. Just keep in mind that you will need to change the Target Collection for the next shoot.
Copy/Paste Settings
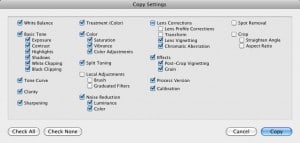
There are many situations in which you will have a group of similar photos that may all require the same basic settings. Rather than editing each photo individually, you can save time by editing one photo and applying those same develop settings to the remaining photos. Let’s say I am editing a photo I took of a flower, and I have adjusted the Contrast, Clarity, and Vibrance. If I have 5 other similar photos of that flower, rather than adjusting the Contrast, Clarity, and Vibrance on each photo separately, I can copy the develop settings on the first photo and paste onto the remaining 5. To do this, simply select the photo you have edited and use the shortcut Shift + Cmd + C (Mac) or Shift + Ctrl + C (Windows). A window will come up asking you which settings you would like copied. In most cases you will leave it as is and click Copy. Next, select the photo you would like the settings applied to, and use the shortcut Shift + Cmd + V (Mac) or Shift + Ctrl + V (Windows). You can paste the settings as many times as you need. Don’t like the results of the settings you just applied? To reset the adjustments just use Shift + Cmd + R (Mac) or Shift + Ctrl + R (Windows).
If you find yourself adjusting the same settings over and over, consider creating a Preset. A Preset is similar to using the Copy/Paste Settings described above, but allows you to save the settings to be used at a later date. For example, if you find that you generally use the same settings every time you create a black and white photo, you can create a preset using those settings. The next time you want to create a black and white photo, simply click on your preset and all of your saved adjustments are instantly applied. From there you can tweak the settings as much as you’d like. To create a preset, click the + button in the Presets panel, or use the shortcut Cmd + Shift + B (Mac) or Ctrl + Shift + B (Windows). You can access your saved preset within the User Presets folder of the Presets panel.
Solo Mode
When working in Lightroom, one of the most cumbersome and time-consuming tasks is collapsing and expanding the many various side panels. Lightroom is known for its efficiency, but even for an experienced user, its many settings can make it difficult to find what you’re looking for. For a busy photographer (especially when on a time crunch), manually opening and closing panels is tedious. This is especially true in the Develop Module.
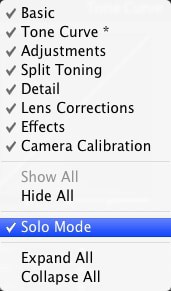
Thankfully, Lightroom has a setting in place that makes navigating the interface much more user-friendly. This is called Solo Mode. With Solo Mode in place, any open panel will automatically collapse once you interact with another one. Rather than spending valuable time scrolling back and forth, you can navigate around the panels at lightning-speed. Try it out once and you will never go back. This one setting alone will give you a huge boost in productivity, saving you hours over the course of a lifetime!
To turn on Solo Mode: hold down Option (Mac) or Alt (Windows) and click on a panel header. You can also right-click on any panel and select Solo Mode.
Straighten Tool When Cropping
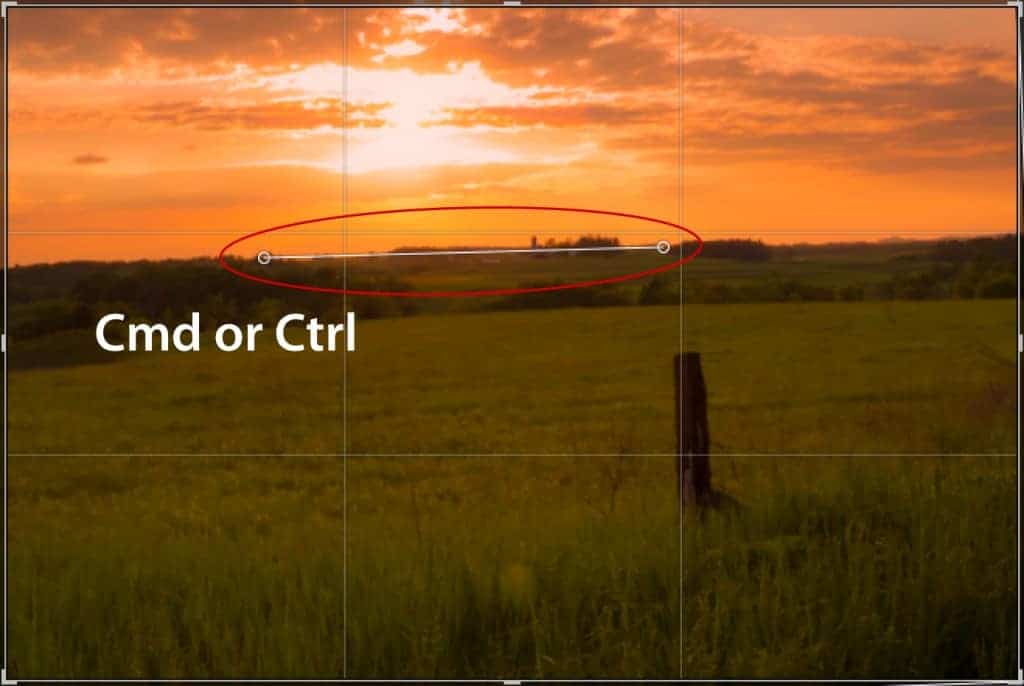
The Straighten Tool within Crop Mode can be used to straighten out a photo by drawing a line across anything that should be a straight line, and the crop will automatically adjust itself so this line is horizontal. This is especially helpful for those photos where the horizon line isn’t quite level. If you have several photos that need these adjustments, you can speed up the process by using a quick shortcut. To get to Crop Mode quickly, just press R. When inside Crop Mode, rather than accessing the Straighten Tool by clicking on the icon in the panel, just hold down the Command (Mac) or Control (Windows) key and the straighten tool will appear. From there just draw the line and the crop will adjust. This is a quick way to straighten a photo without needing to click on the tool itself.
Switch Between Brush And Eraser
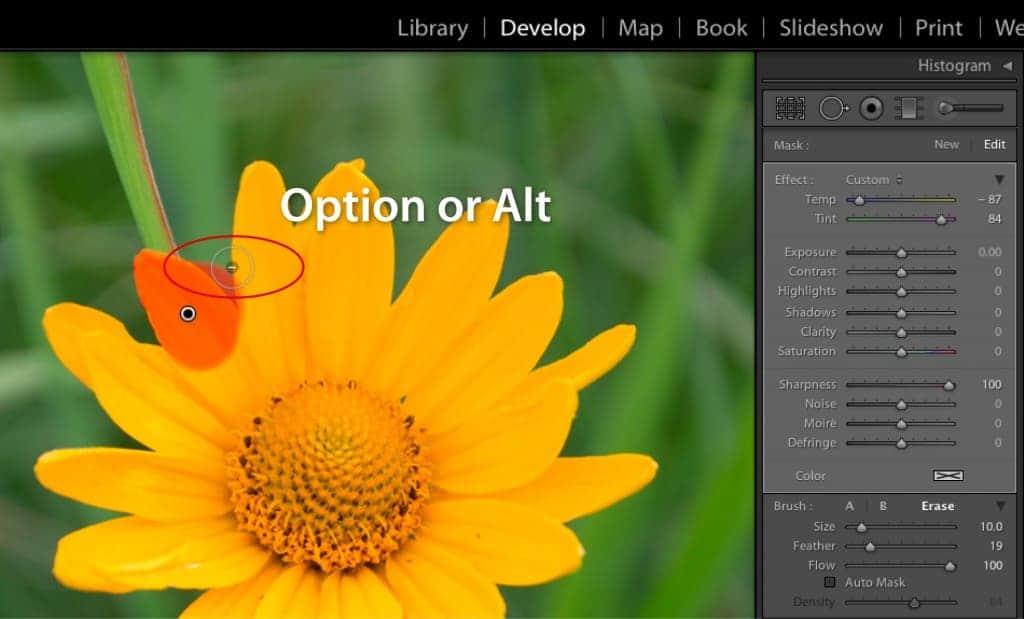
One of the best features of the Lightroom adjustment brush is that the changes you make to the photo are nondestructive and always able to be edited. When editing, you may spend a lot of time using the adjustment brush to do detail work and small, local corrections. Because these adjustments aren’t permanently applied to the photo, you might find yourself switching back and forth between the brush and eraser tools. Rather than going to the panel every time you want to make the switch, try using the quick shortcut Option (Mac) or Alt (Windows). You can go back and forth between the two tools without ever leaving the photo. This can be a great time saver, especially when doing a lot of small detail work.
Reset Sliders
When you open one of the Develop Module tools, such as the Gradient Filter, Radial Filter, or Adjustment Brush, the sliders remain in the same position as when that tool was last used. To very quickly reset all the sliders for a tool, double-click the word Effect in the upper left corner of the toolbox. This also works for each of the individual adjustment sliders. Click on the title of the slider to reset the slider back to zero.
Show/Hide Pins
Whenever you use the gradient tools or Adjustment Brush, a pin is dropped on your image to mark where the tool was applied. When you have multiple pins on an image, they can get in the way and make it difficult to see the image. A quick way to hide the pins is by pressing the H key. All of the pins, including ones that you continue to apply, will be hidden from view. I particularly like to use this shortcut with the Spot Removal tool. If you have ever tried removing several spots in an image, you know that the patches left by this tool can get in the way and make it impossible to select another area to fine tune the spot removal. Using the H key will also hide all of the patches that have been applied, making the tool much easier to use. Just don't forget that the pins are hidden when you come back to the image later or if you go to the next image and can't figure out why you can't seem to drop new pins.
Show/Hide Paint Overlay
In much that same way as hiding pins, this shortcut is used in conjunction with the gradient filters and adjustment brushes. When applying a selective adjustment via one of the filter tools or brushes, you may want to see what areas of the image are being effected by the adjustment. Pressing the O key will toggle on the paint overlay, which will be shown in red. This can allow you to fine tune your adjustments without guessing where you have already been. Pressing the O key again will toggle the paint overlay off.
Rotate Crop
Although it is best to get everything right “in camera”, sometimes it is necessary to crop an image. The crop tool is on the left side of the toolbox in the right side panel of the develop module. To open the crop tool quickly, and avoid clicking on the tool icon, you can use the R key. With the crop tool open, you can very quickly rotate the crop by pressing X on your keyboard. This shortcut comes in handy when you have an image that was shot in landscape orientation, but you wonder if it would work better vertically. This shortcut can be used to cycle between the orientations, allowing you to judge which is best for your image. It is also much faster than clicking and dragging the handles on the cropped image.
Show Clipping
While certainly not always the case, the general goal with any image is to properly expose highlights and shadows without blowing out the bright parts or “blocking up” the dark areas. If there are bright or dark areas of an image without any detail, those areas are said to be clipped. There are a couple of ways to see clipped areas in an image within the Lightroom develop module. In the upper right and left corners of the histogram are two small triangles. Clicking on the left one will show areas that are clipped black; clicking on the right triangle will show areas that are clipped white. All of that clicking can get cumbersome. Instead, just press the J key and all black and white clipped areas in the image will be shown. Black clipped areas will be shown in blue and white clipped areas shown in white. This is a quick way to see areas in your image that may need some highlight or shadow recovery.
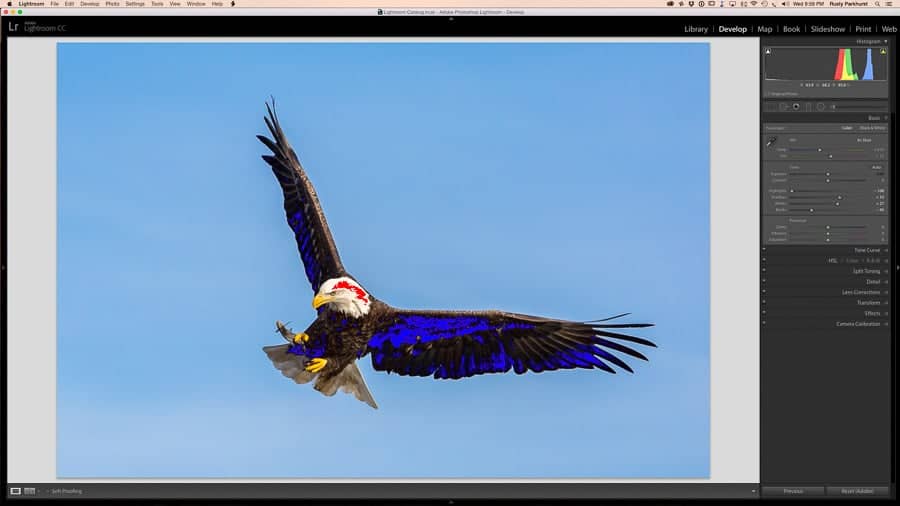
Photo Merge HDR and Panorama
Merging images to create a high dynamic range (HDR) image or panorama has never been easier since the addition of the Photo Merge option in Lightroom. Prior to including this feature, creating these images required going outside of Lightroom to either Photoshop or other software. Now, all you have to do is select the images you want to merge within the develop module and choose HDR or panorama. This will typically take you to a separate HDR or panorama preview window where you can choose from different options before making the final merge. If you want to skip the extra dialog box, and allow the images to merge in the background while you continue to work on other things, there are shortcut keys for doing that. For HDR, select the images you want to merge, then press Shift + Ctrl + H (Mac) or Shift + Alt + H (Windows). This works the same way for panoramas, but use the M key at the end of the sequence.
Zoom In / Zoom Out
There are times that you will want to zoom in on an image to check for sharpness or other detail. You can just click the on any area of the image with the mouse and it will zoom in to 100% magnification. If you want to zoom in further, use Cmd + (Mac) or Ctrl + (Windows). Zooming back out is as simple as pressing Cmd – (Mac) or Ctrl – (Windows).
Convert to Grayscale
This may be a specialty shortcut, mainly for those who like to work with black & white images on occasion. There are times that you have an image that may work well as a black & white image. A very quick way to get a glimpse of what the image would look like without the color is simply pressing the V key in the Lightroom develop module. The image will switch to grayscale until you press the key again to return to color.
View All Shortcuts
This article is but a small portion of all the shortcuts that are available in Lightroom. There are so many, it is likely you will forget some along the way, or maybe want to check to see if there is a shortcut you haven't tried yet. Adobe has built in a list of shortcuts for each of the Lightroom modules that can be easily accessed. To access the list of shortcuts from the module you are working in, press Cmd + / (Mac) or Ctrl + / (Windows). A complete list of the available shortcuts will pop up.
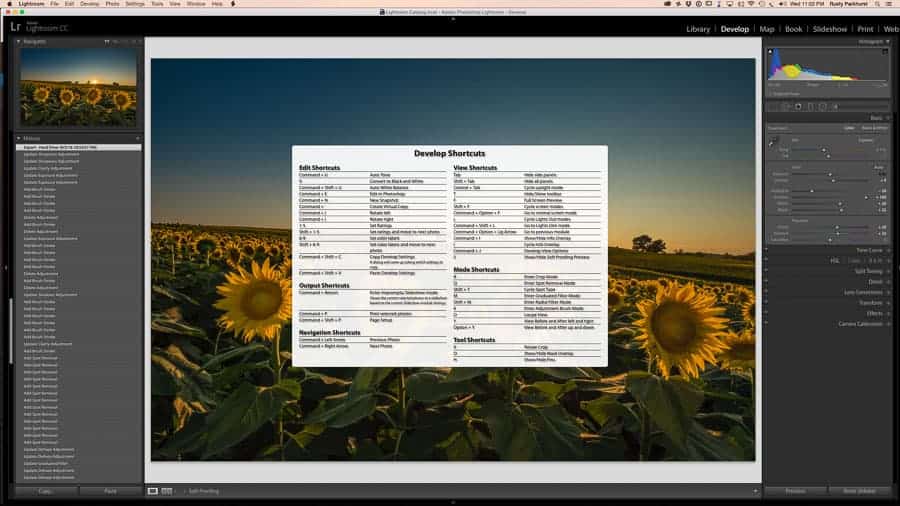
As you can see, there are a huge number of shortcuts that are available in Lightroom. Memorizing all of them would be nearly impossible and not really necessary. The list provided in this article are shortcuts that I tend to use on a regular basis. This list may vary slightly for you, depending on your needs. Choose some of the tools you use most often in Lightroom and learn the shortcuts for those. Learning shortcuts will end up saving you hours in your workflow, and takes only seconds to learn. Plus, the faster you can get through post-processing your images, the sooner you are able to get out to make more. If you’d like to learn more shortcuts, download our printable Quick Guide to Lightroom Shortcuts (Mac or Windows). While it isn’t a full list by any means, it’s a great way to start learning!
Now that you’ve read about these 20 shortcuts, let us know: What shortcuts do you find essential to your Lightroom workflow? What would you add to the list?

…please re-number your shortcuts. They are all numbered “1”.
great tnx
I would add the F shortcut (maximize window, again makes LR in full screen
I’d also add:
When using the crop tool, press X to switch the crop between horizontal and landscape.
Rob
thank you for all of these, especially to Rob. Using the X when cropping is absolutely brilliant!!!!!
Thanks so much! You guys are just the greatest!
Great tips! Caps Lock Advance and the Straighten Tool were both welcome news to me.
Along with using copy paste, I use Paste Settings from Previous Selected Photo all the time (Ctrl+Alt+V for PC or the Previous button to the right of the toolbar in the Develop Module). You can simply switch directly from that flower shot you spent 3 minutes adjusting to the next similar photo from the filmstrip or grid view (they’re not always rignt next to each other) and apply the paste settings from previous command. It can be faseter because it skips the copy settings pop-up window and applies *all* the same settings in one step.
*faseter = faster, only taking even less time, I guess…
I am a first-time LR user; just installed LR 5.0; is ‘erase’ the same as ‘heal’?
Tiberman, In your brush panel at bottom panel, you will see brush A B Erase, Erase removes any mistakes you made with your brushes when editing.
I am also a proud owner and user of Lr since it’s beginning.
Practice is the only magic takes you to the winner seat.
Do your images again and again with a mind to enhance them.
My younger son is having the same age of Lr but I stayed with Lr more time than my son. And of course my wife is not happy with me.
Thanks for the useful articles and great podcast!
Superb web page. A great deal of helpful information the following. Now i’m giving it to several friends ans in addition sharing within delightful. And obviously, thank you in your effort!
You said use P and X for picks but that is partially wrong. X is for saying you DONT want / don’t like that pix and want to flag it to be deleted after you go thru rating all your pix. When u hit X it turns that pix grey in the filmstrip below . Once done rating your pix you can then go back and delete all those you put an X onto. The rule to remember is shoot lots but delete even more
Keep and share only your best work.
I have been using lightroom for mainly as a tool to shortlist and organize my photos, because selecting the photos with photoshop would be a nightmare and trust me I have been there. I usually get so busy neck-deep in my work that I hardly find time to learn any other stuff, now I realize I should be reading a bit too.
You have no idea how much time you have saved me with the first method – auto advance and the third method – solo mode. I just had to say thanks and please keep writing, this is amazing.
Great article Rusty – the type thing I wish I had known when getting into all of this.
One other great little trick is to hit the “O” key when using crop to toggle between overlays 🙂
Helps with compositions
Thanks Brian, and great tip. So many shortcuts…and so little time! 😉
Great info – thanks much for sharing!
Thanks for reading, Tom, and glad you enjoyed the article.
Thanks Rusty for showing/explaining all this shortcuts. Even though I have been using lightroom for quite some time now I did not know about the survey mode.
Thanks Jellis!
There are so many shortcuts, I seem to learn something new quite frequently. Thanks for reading!
Excellent stuff, thx. Only additions that pop to mind are Ctrl-Z to Undo, U to un-Pick and Ctrl-E to take a photo straight into Photoshop.
What I’m looking for is a way to assign a keyboard shortcut to a preset so I don’t have to go finding them (and yes, I know about copy from an image i’m developing), but once I find favorite presets (and I have a big list), I want to quickly apply them with the keyboard. Any suggestions?
Hey Mitch. I’ve never tried assigning a keyboard shortcut for a preset, but that would be a great idea. I’ll have to give it a try. Thanks for reading!
Nice help for the shortcuts ….goona try it!!!!
Thnkyou!!!!!!!!
Thank you for this fantastic article! Just beginning to learn the basics of Lightroom and the first few hints alone have already made a HUGE difference in my workflow! Thank you so much!
API Calls for the for preset shortcuts perhaps have been created in the SDK. That is only my presumptions, because MIDI2LR managed to connect custom presets to MIDI buttons.
But finally I want to be able to use my own keys to assign to my most used presets both template and local adj.